

Images and some links no longer work due to the loss of attachments and DLDB files from v4.1. Some images may be replaced at an uncertain point in the future, but no guarantees.
Text formatting has now been completely restored, and the infested battlecruiser GRP is online again. Also, some spelling mistakes never corrected have been fixed.
Also, the tutorial has been edited slightly to be current in its acknowledgments of being out of date.
")
--DT_Battlekruser
September 9, 2007
----------
Ye Olde Moddinge Tutorial
by DT_Battlekruser
Commissioned for the new Staredit Network Modding Department
First version written May 24, 2005
Last modified or updated: September 2007
TABLE OF CONTENTS:
I. F.A.Q
II. Getting Started
___ A. What do I need?
___ B. What are these strange and wondrous things?
___ C. Where can I find these strange and wondrous things?
III. Your first MOD in 11 easy steps
IV. Another foot in the door --- Rocket Tank
V. A Visual Facelift --- Implementing TBLPad
VI. X-mas Vultures --- Fun with RetroGRP
VII. 2+2+2 = ...6? --- Putting it all together
VIII. Ultimate Eye --- First steps with StarGraft and MemGraft
I. FAQ
What is a MOD?
A MOD or TC (Total Conversion) is a way of changing the Starcraft base data files (StarDat and BrooDat.mpq) to change almost any aspect of the game.
How do I run a MOD?
First, you must have the patched .mpq from the person that had the mod. You must also have the program MPQDraft101 (see IIc). Open MPQDraft and follow steps 8-11 from chapter III substituting "scv.mpq" for the .mpq that you want to use.
How do I implement MEMGraft patches?
On the third screen of MPQDraft, select "Browse for Plugins" and find the .qdp file. Then select "Configure Plugin" and find the MEMGraft .mem file. Then click finish to run your StarGraft patch.
How do I "un-do" a MOD?
Close Starcraft, and start it again in the normal way, and any changes will be undone.
Can I play MODs with my friends online?
Yes. However, the friends you play with must have been shipped the patched .mpq in advance. If they are playing a regular version of starcraft, then it won't work.
If I make a MOD for the campaign editor, and I make a map with the modified campaign editor, does it mod the map?
Not really, no. A .scx/.scm file can only hold what data you can map. So if you change cooldowns for the campaign editor, then save a map with it, Starcraft will use the default cooldowns. But if you mod the editor to give marines 6000 hp and save a map, the marines will still have 6000 hp.
OMG this is so coolzors! I wanna make an Uber mod!!!
Be warned. Modding is a very meticulous and tricky process. It is easy to generate errors and takes a wide variety of skills. I suggest you become familiar with the modding ideas and make some text mods before you launch your own project.
Help! My StarDat.mpq file is a ton of unknowns!
Get "Starcraft-Brood War.txt" from this .zip and save it in your WinMPQ folder. Now, open WinMPQ, select 'Options...' from the menu, then go to the 'File Lists' tab and 'Add Listfile...'. Now select "Starcraft-Brood War.txt", which you just downloaded. Now open an MPQ and you'll find the ~unknown files are now gone, and there are useful names instead.
II. Getting Started
A. What do I need?
To become a successful modder, you need a variety of modding tools, all of which are free. You also need an abnormally large amount of patience. The programs you will need in your future career are:
- Arsenal III or DatEdit*
- MPQDraft
- WinMPQ
- TblPad
- StarGraft
- MemGraft
- ICE or ICECC
- RetroGRP**
- An advanced picture editing program
- SC AI edit (optional)
- others (optional)
B. What are these strange and wondrous things?
-Arsenal III (or DatEdit) is a .dat modifier. It changes the .dat files of Starcraft, changing any raw unit and weapon data. From changing attack and sight ranges to cooldown, and from giving shields to allowing to build on creep, Ar3 is your program.
-MPQDraft is a self extracting patch maker. You can write your own patch or simply run a patched MPQ using it
-WinMPQ is a .mpq editor. It allows you to edit the .mpq, the list of data files Starcraft reads. You can change the .grp for a marine to that of a tyrannosaur, if you wish.
-TblPad allows you to edit the TBL files, or text strings. It can change any text is Starcraft, from the names of weapons to the "Cheat Activated"
-StarGraft allows complicated memory patches. It allows you to edit the tech tree and such. Patched files from StarGraft or only compatible up to Starcraft 1.07
-MemGraft updates StarGraft patches to the current version of Starcraft.
-ICE or ICECC allows you to write custom animation scripts
-RetroGRP allows you to compile .bmp files into a single .grp for Starcraft, and also extract the sprites of Starcraft
*This tutorial was written using Arsenal III, which is still fully compatible. DatEdit, however, is a newer DAT editing tool, and it is my recommendation that you use it.
**Like Arsenal III, RetroGRP has been surpassed since May 2005 by better and faster GRP manipulators. Though it is still fully compatible and works, programs such as GRPEdit are more modern.
C. Where can I find these strange and wondrous things?
Most of these are now in the DLDB under modding tools. If you ever seriously start modding hardcore, you'll need a good graphics editor, and those aren't free, though.
III. Your first MOD in 11 easy steps
0. Make sure you have all the required programs installed on your computer
1. Open Arsenal III. Go to Unit Editor. Find Terran>Ground Units>Terran SCV
2.
a) Enter the number 1000 in the "HP" box.
b) Check the check box next to "Shields" and put 1000 in the Shields box.
c) Change the SCV's ground weapon to "C-10 Canister Rifle"
3. Go to File>Save As. Save your file in C:\Program Files\Starcraft\testmod\units.dat
WARNING: You must save this as units.dat, not any other file name
4. Close Arsenal III.
5. Open WinMPQ. Go to File>New and save as scv.mpq.
6. Click "add" and find your units.dat you saved in step 3. WinMPQ will prompt your for an input. Type arr\ and hit ENTER.
7. Close WinMPQ.
8. Open MPQDraft and go to "Load MPQ Patch". Select "Starcraft" from "Programs" and "Starcraft" from "Components"
9. Click Next. Press "Browse for MPQs" and find SCV.mpq that you saved in step 5.
10. Click next, then Finish.
11. Starcraft will start. Play any melee map as Terran and marvel at your 1000hp 1000 shield SCVs with rifles.
[attachmentid=9551]
An SCV with shields?!?
What went on here?
First, in steps 1-4, you edited the hardcore data file or Starcraft that contains all data about units (units.dat). Then in steps 5-7 you created an extra .mpq archive. Stacraft Broodwar in normal operation reads three .mpq files, StarDat.mpq, BrooDat.mpq, and patch_rt.mpq. These files have a list of data files which Starcraft then loads and uses. When you write you custom .mpq file, you will make Starcraft read that instead. In steps 8-11, you are using a tool to make Starcraft start up and read your MPQ that you made after it reads the three default MPQs. If any files are the same in both (units.dat in this case), it will replace the old occurrence in patch_rt.mpq with the new occurrence in your MPQ you wrote. Starcraft will have now loaded an MPQ file which gives it a units.dat file saying SCVs have shields and C-10 Canister Rifles, so Voila!; that's what show up on the screen.
IV. Another foot in the door --- Rocket Tank
0. Make sure you have all the required files running on your computer.
1. Open Arsenal III. Go to Unit Editor>Terran>Ground Units>Tank Turret (make sure it is the second turret with "Arclite Shock Cannon".
2. Change the turret weapon to "Longbolt Missile".
3. Go to the "Miscellaneous" tab and change "subunit range" to 188.
4. Go to File>Save As. Save as C:\Program Files\Starcraft\testmod2\units.dat
WARNING: You must save this as units.dat, not any other file name
5. Close the Unit Editor, then go to Weapon Editor>Other Weapons> Longbolt Missile
6. Change the Max Attack Range to 700.
7. Change the Damage to 5, and the Cooldown to 3.
8. Change the Attack Flags by unchecking "Air" and checking "Ground".
9. Go to File>Save As. Save as C:\Program Files\Starcraft\testmod2\weapons.dat
WARNING: You must save this as weapons.dat, not any other file name
10. Close Arsenal III.
11. Open WinMPQ and create a New .mpq called rockettank.mpq.
12. Go to "Add" and choose the units.dat you saved in step 4. Remember to type arr\ for the directory prompt.
13. Go to "Add" again and choose the weapons.dat you saved in step 9. Remember to type arr\ for the directory prompt.
14. Close WinMPQ.
15. Open MPQDraft and go to "Load MPQ Patch".
16. Choose "Starcraft" and "Starcraft" then "Next"
17. Browse for and add rockettank.mpq you saved in step 10.
18. Click Next, then Finish.
19. Start any melee map and get a siege tank in siege mode. Use the cheat "black sheep wall" and rain doom with your super-rocket-tanks.
Note: I had a really fun time testing this. I had corrupted my base arr/units.dat in the ar3 folder so marines had 8000 shields 10 hp and 255 armor, and my computer opponent was Terran
")
[attachmentid=9525]
Die you stupid marines, die!
What went on here?
Much like in Chapter III, you wrote a custom .dat file, weapons.dat in this case, put it into an MPQ file, and ran Starcraft with the new MPQ file.
What are some of these Arsenal III values?
Subunit range --- The range at which the unit wil acquire a target and start firing automatically if a)The unit has an AI to auto-attack enemies and b)The aquired target is in range.
Cooldown --- The lag between each time a weapon fires. Lower cooldown equals more attacks per second.
Air and Ground checkboxes --- These determine what kind of targets the weapon can attack (air or ground units).
V. A Visual Facelift --- Implementing TBLPad
0. If you haven't already, do steps 0-10 of Chapter IV. You will be using the .dat files from them.
1. Open Arsenal III. Go to Weapon Editor>Other Weapons>Longbolt Missile
2. Go to File>Open and select the weapons.dat saved in Chapter IV, Step 9.
3. Change Icon to "Gemini Missiles".
4. Go to File>Save As. Save as C:\Program Files\Starcraft\testmod3\weapons.dat
WARNING: You must save this as weapons.dat, not any other file name
5. Close Arsenal III.
6. Open WinMPQ and go to "Open". Open C:\Program Files\Starcraft\patch_rt.mpq.
NOTE: You could extract the tbl from any mpq but if you do it from StarDat then it won't have the medic strings and such so it will crash SC if you try to view any BW strings.
7. Scroll down to rez\stat_txt.tbl
NOTE: If you see a huge list of 'unknowns', you need to implement the MPQ list file.
8. Right-click on it and select "Extract". Extract it to C:\Program Files\Starcraft\testmod3
9. Close WinMPQ.
10. Open TBLPad. Go to File>Open and open rez\stat_txt.tbl that you extracted in step 8.
11. Scroll down to "Terran Siege Tank<0>Siege Mode<0>Ground Units<0>".
12. Replace this with "M-1 Missile Tank<0>Siege Mode<0>Ground Units<0>".
13. Scroll down to "Longbolt Missile<0>".
14. Replace this with "Homing Hailfire Missiles<0>".
15. Scroll down to "Terran Vehicle Plating<0>".
16. Replace this with "Reinforced Tank Armor<0>".
17. Go to "File" and click "Save". (do not rename the file)
18. Exit TBLPad.
19. Open WinMPQ and make a new MPQ, tblpad.mpq.
20. Add the new weapons.dat and the units.dat from Chapter IV; remember to type arr\ for the prompt.
21. Add the stat_txt.tbl you save in step 17. Type rez\ for the prompt.
22. Close WinMPQ.
23. Run tblpad.mpq using MPQDraft. (if unsure how to do this, see either Chapter III or Chapter IV).
[attachmentid=9552]
Custom names. Now that's more like it.
What went on here?
You have editied the string data file for Starcraft, stat_txt.tbl, and used WinMPQ to tell Starcraft to read your file instead. It will therefore replace any strings you changed in the game.
VI. X-mas Vultures --- Fun with RetroGRP
1. Open WinMPQ and open up StarDat.mpq.
NOTE: If you see a huge list of 'unknowns', you need to implement the MPQ list file. (See Chapter I, last question.)
2. Scroll down to unit\terran\vulture.grp
3. Right click on it and select "Extract". Extract it to C:\Program Files\Starcraft\testmod4\
4. Close WinMPQ
5. Open RetroGRP. If you see a popup that says 'Errrrrror!', ignore it. That's RetroGRP-speak for "Hello and welcome!".
6. Click "Set Output Directory" and select C:\Program Files\Starcraft\testmod4\vulture
7. Click "Load External File" and select C:\Program Files\Starcraft\testmod4\unit\terran\vulture.grp. A preview will appear on the screen.
8. Click "Write out BMPs" and select "All BMPs"
9. Close RetroGRP.
10. Go to C:\Program Files\Starcraft\testmod4\vulture. If you followed instuctions properly, you should see 16 BMPs, called vulture000 - vulture016 and a .ral file, vulture.ral.
11. Use Paint to color the gray areas of vultures 000-008 red and the gray areas of vultures 009-016 green.
Note: This process is very time-consuming. Graphics creation and editing is where many aspiring modders turn away.
12. Open up RetroGRP again. Set the output directory to C:\Program Files\Starcraft\testmod4
13. Click "Compile to GRP". Find "vulture.ral" and select it.
14. Check to see that there is an x_vulture.grp file in your output directory. Rename this "vulture.grp".
15. Open WinMPQ and start a vulture.mpq file in \testmod4.
16. Add vulture.grp to the file list. For the prompt, type unit\terran\.
17. Close WinMPQ
18. Run the patched MPQ with MPQDraft (if in doubt see Chapters III or IV).
19. Build a Vulture or two and watch them switch from red (facing up) to green (facing down).
[attachmentid=9526]
The X-mas vultures of doom!!!
What went on here?
Here you change the base graphic file for Starcraft. You use RetroGRP to extract the bitmap files from the grp files, then you change the bmp files. Finally, you recompile the.bmp files back to .grp and put that in a patched MPQ.
VII. 2+2+2 = ...6? --- Putting it all together
0. Make sure you have all the proper programs installed and working.
1. Go to this website: <attachment> and download the graphics for the Infested Battlecruiser. Save it to C:\Program Files\Starcraft\testmod5\ and unzip the .zip file.
Note: The Infested Battlecruiser GRP has rather crappy graphics, I apolgise for this in advance.
2. Rename x_infestedbcruiser.grp to be battlecr.grp.
3. [Optional] - Open WinMPQ and save an MPQ in your testmod5 directory called test.mpq.
4. [Optional] - Add battlecr.grp to the list with unit\terran\ as its path.
5. [Optional] - Run test.mpq using MPQDraft. This will see if you loaded the sprite properly.
6. Open Arsenal III. Go to Unit Editor>Terran Units>Air Units>Terran Battlecruiser.
7. Give the Battlecruiser 1000 HP, 400 shields, and 5 armor.
8. Go to the "Advanced" tab and check "Regenerates HP" and "Permanent Cloak".
9. Save the file as "units.dat" under the testmod5 folder.
10. Open the Weapons Editor and go to Terran Weapons>ATS Laser Battery. Make sure it's the first one.
11. Change the Icon to "Flame Thrower"
12. Change the Minimum Attack Range to 3 and the Maximum Attack Range to 20.
13. Set all the Splash Radii to 30.
14. Change the Damage to 60, the Bonus to 10, and the Cooldown to 65.
15. Change "Explosion" to "Line Splash"
16. Change the Sprite to "Yamato Gun".
17. Select "ATA Laser Battery". Make sure it is the first one.
18. Change the Minimum Attack Range to 5 and the Maximum Attack Range to 20.
19. Change the Icon to "Seeker Spores".
20. Change the Damage to 110, the Bonus to 15, and the Cooldown to 100.
21. Change the Sprite to "Seeker Spores".
22. Save the file as weapons.dat in your testmod5 folder.
23. [Optional] - Open WinMPQ and open the MPQ in your testmod5 directory called test.mpq.
24. [Optional] - Add units.dat and weapons.dat to the list with arr\ as their path.
25. [Optional] - Run test.mpq using MPQDraft. This will see if you edited the DATs properly.
26. Close Arsenal III.
27. Open TBLPad and open stat_txt.tbl. If you haven't yet extracted stat_txt.tbl, follow Chapter V, Steps 6-9.
28. Scroll down to "Terran Battlecruiser<0>*<0>Air Units<0>".
29. Replace with "Dark Terran Battlecruiser<0>*<0>Air Units<0>".
30. Scroll down to "Terran Starport<0>*<0>Buildings<0>
31. Replace with "Infested Starport<0>*<0>Buildings<0>"
32. Scroll down to "ATS Laser Battery<0>". Make sure it's the first one.
33. Replace with "Fury's Fire<0>".
34. Select "ATA Laser Battery<0>". Make sure it's the first one.
35. Replace with "Poison Spores<0>".
36. Scroll down to "b<1>Build <3>B<1>attlecruiser<0>"
37. Replace with "i<1>Build <3>I<1>nfested Battlecruiser<0>"
38. Scroll down to "Battlecruiser Requires:
Attached Control Tower
Science Facility with
attached Physics Lab<0>"
39. Replace with "Infested Battlecruiser Requires:
Attached Control Tower
Science Facility with
attached Physics Lab<0>"
40. Go to File>Save As and save as stat_txt.tbl in your testmod5 folder.
IMPORTANT: You must save it as stat_txt.tbl or your MOD won't work.
41. Close TBLPad
42. Open WinMPQ and make a new MPQ, dtbk.mpq.
43. Add battlecr.grp with extension unit\terran\.
44. Add units.dat and weapons.dat with extension arr\.
45. Add stat_txt.tbl with extension rez\.
46. Run the patched .mpq with MPQDraft. (if in doubt see Chapter III or Chapter IV). Build a Battlecruiser and have some good old fun.
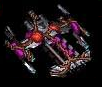
[attachmentid=9553]
If only DT_BK's were real... *sigh*
What went on here?
This combines the work of all the previous chapters. You edit the Battlecruiser's weapon stats, unit stats, strings, and graphics, and put them into a patched MPQ.
VIII. Ultimate Eye --- First steps with StarGraft and MemGraft
Consistency Note: MEMGraft does not have a supported version for the current Starcraft Patch, 1.15.1. The latest version of MEMGraft is 1.12e. This tutorial was written for MEMGraft 1.12b.
Another, more advanced memory editing program called Firegraft is functional for Starcraft version 1.15.1 (the current version). Since its release postdates this tutorial, it is not implemented.
0. Have all required programs installed and running.
1. Open Arsenal III. Go to Unit Editor>Terran Units>Ground Units>Terran SCV.
2. Go to the "Advanced" tab and check "Detector", "Spellcaster", and "Permanent Cloak".
3. Go to the "Miscellaneous" tab and change "Sight Range" to 8.
4. Save your units.dat file to C:\Program Files\Starcraft\testmod6
5. Go to "Technology Editor".
6. Go to Terran Technologies>Scanner Sweep.
7. Change Energy to 0.
8. Go to Terran Technologies>Lockdown.
9. Change Energy to 0.
10. Check "Researched".
11. Go to Protoss Technologies>Maelstorm.
12. Change Energy to 0.
13. Check "Researched".
14. Save your file as techdata.dat in your testmod6 folder.
IMPORTANT: This must be saved as techdata.dat, not any other filename.
15. [Optional] - Make an MPQ file with your two DATs and run it to see if the changes were made appropriately. If in doubt, see Chapter III on how to make .mpq files and run them.
16. Close Arsenal III.
17. Open StarGraft 1.07 and double-click on "Patch Creator".
18. Go to File>New and save as eye.pat in your testmod6 folder.
19. You should be in the "Buttons" tab. Scroll down to "Terran SCV".
20. You should see a Dropdown box called "Command". Select "Terran Basic Buildings" from the menu.
21. Change the Icon to "Scanner Sweep".
22. Change Req. Type to "Spell Researched".
23. Change Action Type to "Use Technology".
24. Change Req. var and Action Var both to 4. (?)
25. Change the "String" to "s<3><3>S<1>canner Sweep (Detector)"
26. Select "Terran Advanced Buldings" from the "Command" dropdown. Note that where "Terran Basic Buildings" once was, it now says "Scanner Sweep".
27. Change Icon to "Lockdown".
28. Repeat steps 22 and 23.
29. Change req. var and action var to "1".
30. Change "String" to "l<3><3>L<1>ockdown".
31. Select "Cancel" from the "Command" dropdown. Note that where "Terran Advanced Buildings" once was, it now says "Lockdown".
32. Change Icon to "Maelstorm".
33. Repeat step 28.
34. Change req. var and action var to "31".
35. Change "String" to "e<3>Ma<3>e<1>lstorm".
36. Go to the "Requirements" tab and the "Tech Use" sub-tab.
37. Select "Scanner Sweep" from the list at left.
38. Slide the bar all the way to right.
39. Right-click and select Insert.
40. Repeat step 39 twice.
41. For the first new requirement created, select "Flag" and "[previous requirement] or [next requirement]".
42. For the next, select "Flag" and "Current unit must be [next requirement]".
43. For the last, select "Terran SCV".
44. Select "Lockdown" from the list at left.
45. Slide the bar all the way to right.
46. Right-click and select Insert.
47. Repeat step 46 twice.
48. For the first new requirement created, select "Flag" and "[previous requirement] or [next requirement]".
49. For the next, select "Flag" and "Current unit must be [next requirement]".
50. For the last, select "Terran SCV".
51. Select "Maelstorm" from the list at left.
52. Slide the bar all the way to right.
53. Right-click and select Insert.
54. Repeat step 53 twice.
55. For the first new requirement created, select "Flag" and "[previous requirement] or [next requirement]".
56. For the next, select "Flag" and "Current unit must be [next requirement]".
57. For the last, select "Terran SCV".
58. Go to File>Save and press OK.
59. Close StarGraft.
60. Open MEMGraft 1.13e.
61. Click on "Import *.pat" and select the "eye.pat" you saved in step 18.
62. MEMGraft will prompt you with an error "stat_txt.tbl not found!".
63. Click OK and select stat_txt.tbl. If you don't have it yet, extract it from patch_rt.mpq. (See Chapter V, Steps 6-9).
64. Go to the "Misc." tab.
65. In the text field called "patch_rt.mpq", replace "\patch_rt.mpq" with "\eye.mpq".
66. Go back to the "Main" tab and click "Save Release".
67. Save mgpatch.mgd and eye.exe in your testmod6 folder.
68. Close MEMGraft 1.13e.
69. Open WinMPQ. Open patch_rt.mpq in your Starcraft folder.
70. Go to Tools>MPQ Embedder
71. Go to File>Open, and open patch_rt.mpq in your Stacraft folder.
72. Click "Save MPQ" and save as "eye.mpq" in your testmod6 folder.
73. Close the MPQ Embedder and open up eye.mpq that you saved last step.
74. Add units.dat and techdata.dat saved in steps 4 and 14 with arr\ as the prompt.
75. Add mgpatch.mgd saved in step 58 with custom\ as the prompt.
76. Close WinMPQ.
77. Go to your testmod6 folder. Copy eye.exe and eye.mpq into your Starcraft folder.
78. Run eye.exe and have fun with the SCVs. After 78 steps, you deserve it!
Please Note: In this mod you only gave the SCV the button to use some of the abilities. Some will crash if you try to use them because the special ability Iscript for the SCV is missing. See the forthcoming Chapter X for more details.
[attachmentid=9950]
Ownage SCVs
What went on here?
Here you wrote a special patch file. It reads the MPQ and allows for custom button data.
Attachments:
Post has been edited 37 time(s), last time on Jan 1 2008, 7:28 am by DT_Battlekruser.
None.