Staredit Network > Forums > Modding Discussion > Topic: Polaris's 3d modeling tutorial (Complete)
Polaris's 3d modeling tutorial (Complete)
Aug 14 2008, 4:42 pm
By: Polaris  

Aug 14 2008, 4:42 pm Polaris Post #1


Full tutorial, start to finish, on learning how to make 3d models, texturing them, and getting them into Starcraft. I will be writing these in parts, and I expect this to hopefully be finished by the end of the week. Well, actually, I might be able to finish it sooner if I just rip off of Corbo's 3dsmax rendering tutorial... but he left out a few parts that I want to make clear, so, yeah.

Alright, here we go:

First, make sure you have these programs:

Wings 3d http://www.wings3d.com/
3Dsmax (The trial version works for rendering as well) (If you cant get 3dsmax, try Gmax, I believe it should have the same rendering ability as 3dsmax)
GIMP - Not always needed, but most renders dont look good hot of the press. http://www.gimp.org/
Some GRP conversion software.

---

Part 1: Creating your 3d model

So, have you always been in envy of those mods with the cool 3d rendered units? Well, have no fear, after reading this, you will be able to do the same thing!

Alright, to begin, if you havent already, download Wings 3d. If you have it installed and ready to go, open up the program. You should see a screen like this:


HUGELY IMPORTANT!!!! Wings 3d has some bugs with saving stuff, and occasionally crashes when using the "Save as" function. To prevent it crashing, we must save it before we actually start creating anything. So, go to file>Save As> Type the name in, then hit ok. If it crashes, just start it up and try it again. Note that it will never crash when when you save normally, by just clicking "save" when you are making the model.

Back on track, that screen is pretty plain and empty, right? Lets fix that.

Wings 3d's functions are pretty much all mouse based, so, keep in mind, the right mouse button will be your best friend.

Anyway, the basics of camera control: You press and release the middle mouse button. Wow, that was easy! Now, just move your mouse around to move around the 3d plane. Scroll up or down with the mousewheel to zoom in or out. When you have the camera position where you want it, just press the middle mouse button once more, and it will lock your view, and you can work normally.

Alright, that's it for the camera, lets start making our model!

Right click anywhere on the screen. It should bring up a menu like this:


Select the Cube option. You should now have a nice, fat, juicy cube sitting in the center of your screen.


Now, lets turn this stupid looking cube into one sexy space ship!

Make sure you have Face Select active:


Select the front face of the cube, pointing outward to the Z axis.


Right click anywhere on the screen, bringing up that infamous right click menu. Select "extrude," and then "Normal."((Quick explanation here: If you extrude normal, it will extrude where ever the face is pointing. If you extrude on say, the y axis, it will extrude the face up or down)) Now you will find if you move your mouse, the face will be either extended outward, or into the model. We want to it extend outward.


Save periodically, don't forget. ;)

Next up, we want to bevel that front face. Make sure the face you extruded before is still selected, then right click anywhere, and select "Bevel." Move your mouse around until you get it the way you want.

K, working our way through the varius functions... Deselect the front face by pressing the space bar, or clicking on it again. Now, we want to select the two far faces on the side, or, pointing on the X axis. Now, to select multiple faces in Wings, you dont need to hold down control, or anything, just click on them. Click on both faces on the left and right X axis.


Now, another wonderful function: Inset. Right click with the faces selected, and go down to "Inset." Now, moving your mouse, you will see that this makes the selection you have on those faces much smaller, or bigger. We want to make it smaller, but not too small. Here's about how small you should inset it:


Right, so, these are supposed to be wings on our little space ship, so lets make that selection not as high. Right click, and go to Scale>y axis.(Scale is a huge function, and it can be used for a wide variety of things, experiment with it) Now, moving your mouse, it adjusts the height of your insetted selection. Make it thin, something like this:


k, lets make those wings! Right click, and extrude them, normally.


But they still dont look like wings! Let's fix it. With the two faces on the end of the wings selected, right click, and go to Move> Z axis. Move the mouse until the wings are back about this far, or however far you want them:


Alright, one last thing to do to finish off those pesky wings! With those two end faces still selected, right click, and go to Scale>y axis. Move the mouse until they are like this:


Good, now they look like wings!

Say, this whole ship is way to big and fat. We should change that. Change your selection mode from Faces to whole Entities:


Now, select your whole model. Right click, go to scale> y axis, and scale it until you think it looks right.


Yay, now it looks remotely like a ship designed by drunk engineers! In fact, worse then that, it looks like it was designed by some silly 14 year old kid who has too much time on his hands! Oh wait...

Now, we have one last thing to do: The engine. Switch back to the face select mode, at the top. Select the back face on the model, and inset it slightly.


Then extrude it a bit. Ok, now, select all the faces around the engine, except for the front face.


Now, right click, and select smooth. Your engine should now be circular. Almost done... (Also, the smooth function is very nice, but it also drastically increased the polygon count of your model, so only use it when needed. More polygons makes it harder to texture properly.)

Go to the Edge select mode, at the top.

Make sure you press the space bar to deselect everything before you start this part. See those edges in the back of the engine creating a sorta diamond shape? We don't want those. Select them.


Right click, then go to dissolve. (or you can just hit backspace, that's the shortcut) Those edges you selected should be gone now.

Switch back to face select mode, and select the back face of the engine, where you deleted those edges.Right click, and inset it slightly.


Next, with that face still selected, go to extrude>normal, and instead of making it go outward, this time, we want it to go inwards. Make it go back about this far:


Now, the finishing step! Right click, and go to Bevel. Bevel the face until it looks about like this:


And thats it! Your done! At least, with the basic tutorial. Do whatever you want to make the ship look better, and practice up with making your models. Basically in the tutorial, I wasn't trying to show you how to make something amazing, I was just teaching you how wings worked, and going over the basic functions\modes\ect. The rest of the learning is up to you! So, what are you waiting for? GO MAKE SOME MODELS!

-End part 1.

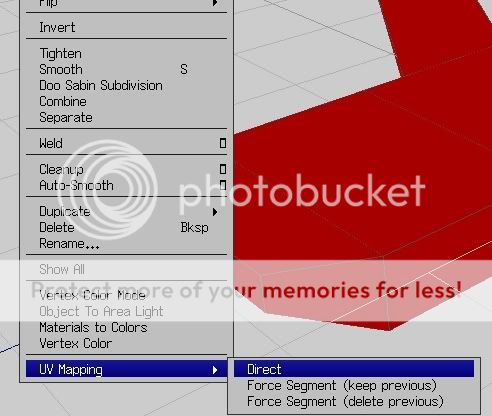
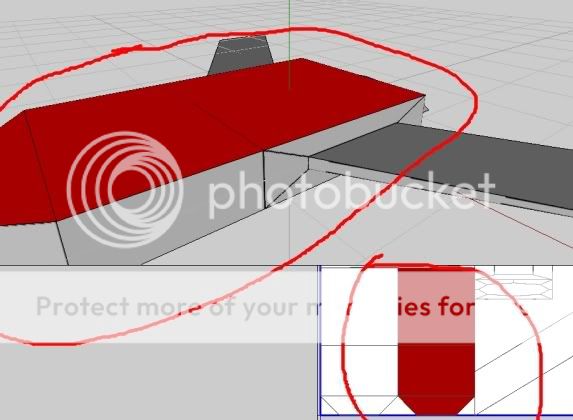
Part 2 will be on UVW mapping, which is a very advanced form of texturing. (sounds scary, huh? Well, its not that hard, really, as long as you know a bit about GIMP, or photoshitshop)

JUST KEEP IN MIND! THE FEWER POLYGONS\FACES YOU HAVE ON YOUR MODEL, THE EASIER IT WILL BE TO TEXTURE! Besides, SC rapes the quality of the models anyway, so there really isnt a huge need to make a model more then 400 polygons.

Have fun!

Post has been edited 2 time(s), last time on Aug 19 2008, 9:45 pm by Polaris.


If anything cool is ever going on Skype me up under the name "blarghle"

Aug 15 2008, 7:39 pm Polaris Post #2


Part 2- UVW Mapping and Texturing

(Make sure your model is saved before you start this step! Screw-ups here are bad.)

So, we have an awesome space ship here, but it looks quite bland. We should probably change that.

Go to the Whole entity select mode.

Select your ship. Right click, go to UV Mapping, then Direct.


You should now have a window pop up looking like a copy of the other one. But its not, exactly.

Really quick, let me explain what UVW mapping is. UVW mapping is unwraping your 3d model into a 2d image, basically. Its also the most advanced form of texturing. Anyway, moving on...

Right click in your new window, and go to Segment by>Projection. Your model should now look pretty funky colored, like this:


What those odd colors are, are coordinates for unwrapping your model into a 2d image. Its hard to explain, but you'll get it as you follow this.

Now, for this model, using the Segment by Projection was almost perfect, but for most models, it takes a little bit more then that. Lets just change one thing:

Look at the front of the ship. See those 3 different colors in the front?


Select those faces. Once selected, right click, and go to AV chart 4. (Its the green color) Those faces you selected should now look green.

Alright! Now your model is all divided up, and ready to be unwrapped into a 2D image! Right click, and go to Continue>Projection Normal.


Now, wait a second, and your model should be fully unwrapped! (Note, if it comes up with "could not calculate normal for chart, just ignore it, it means nothing important)

So now you have the alphabet pasted onto your ship. Now, unless you want it like that, I suggest we put something a little less gay to be the texture. Right click in your Unwrapped model's window, and click Create Texture. Use the parameters as below:


Hit OK, and your unwrapped model should look like this:


(Note, don't close out of the UVW window, you will need it later. Just resize it if you have to. If you did\do close out of it, get back into it by following the first 2 steps)

Also, very useful hint: You can click on the unwrapped objects in the window, and not only will it highlight it in the UVW window, but it highlights it in the normal window as well. This is useful for identifying what face is what:


Moving on, in the MAIN geometry window, at the top, not right click, go to Window>Outliner. This should bring up a small window looking like this:

See the cube1_auv entry? Thats your unwrapped UVW texture. Right click on it, and go to Make External.


Save it somewhere where you will remember it.

Now comes the fun part! Fire up GIMP, and open up the texture you just made External. Create a new layer. Layers>New Layer. Leave the parameters alone, and hit OK. Now, download and save this texture, and copy it into your Unwrapped UVW image: http://i536.photobucket.com/albums/ff328/Psiyon/newtexture-1.png
Heres what it should look like:


Now, we arent done yet. Go to Dialogs>Layers. It should bring up this window:


Move the bottom layer to the top. (click and drag it) Now, you should see your unwrapped model in the front. Find the wings. (The topsides of them, that is) To find the right ones, switch back into wings, and follow this:
"You can click on the unwrapped objects in the UVW window, and not only will it highlight it in the UVW window, but it highlights it in the normal window as well. This is useful for identifying what face is what:

"

Now, back to GIMP, click on the fuzzy select tool. (Shortcut is U) Now, with that on, select the two topsides of the wings (Hold shift while you go to select the other one):


*Do note that those two that I have selected might not be the right ones for yours.

Keeping those two topside wing faces selected, go into the Layers Dialog. (Dialogs>layers, if you closed it)

Move your textured layer back to the top. You should now see the texture, with the outlines of the two wings still selected. Now, make sure these are still selected. Switch to the Bucket Fill tool. (Shortcut is Shift + B) Now, go to the tool options window. (if you closed it, go to Dialogs>tool options)

Go down, and check the "Fill whole Selection" box:


Now, one last thing to do: Go to the main GIMP panel, and double click on your foreground color.

(Its Black by default) Change it to this color: ff00fc


Now, with the Bucket fill on, and your foreground color set to pink, click on the outlined selections. They should now be colored Pink.


Now, we are ready to stick this back into Wings3d. Deselect the two wings. Go to Image> Flatten Image, or you can merge the layers in the layers Dialog. Either way, it has to be 1 layer. Now, Save it. Dont save it as a new one, save right over the original. Ctrl+s.

Finally, we can get the texture on our model. Head back into Wings 3d, and go to the Outliner window. (It can disappear sometimes, so its Window>Outliner.)

Select your Cube1_auv, right click, and select "refresh."


You should now see your texture magically appear onto your model.


One last thing to do. Back in the outliner window, select your Cube1_auv once more. Right click, and select "make internal."

You're done. But before you save it, lets prepare it for the next section of the tutorial.

Go to File>Export>Wavefront (.obj), and save it somewhere you will remember it.

CONGRATULATIONS! YOU KNOW HOW TO UVW MAP! Feel free to experiment with it, and make your poorly textured model look 100x better. Just remember: Keep it simple. If you use too many decals and stuff, it will get raped of quality when you put it in Starcraft, and it will also probably look like shit as well.

--End part 2
Hope you enjoyed it!


If anything cool is ever going on Skype me up under the name "blarghle"

Aug 19 2008, 9:43 pm Polaris Post #3


Part 3 - Rendering Your Unit


Congrats on making it this far. This is also, by far, the easiest part of it all.


Boot up 3Dsmax, or Gmax.

Once booted up, go to File>Import. When it brings up the explorer window, navigate to the folder your exported .obj file is in. Click the File Type dropdown box, and select Wavefront Object (.obj)


Hit ok, ok again, and ok once more, then you should see your model, untextured, loaded into 3dsmax. (You will see the texture when you render it, don't freak out.)

Now, the first step: Rescale the time to 17 frames. See the timeline on the bottom? On the right, click this button:

The mouseover says Time Configuration, and looks like a window with a clock, for those who cant see.

Once you click that, it pops up with a window looking like this:

In the Frame count box, change it to 17, and hit Rescale Time, and hit ok. Your timebar should now only have 17 frames, instead of 101.

Next step: We need to create an Arc for our camera to follow. Turn on Snaps.

Now, in the sidebar, go to Create>Shapes>Arc.


Now, move to your Top Viewport. (If you dont have one, press the T key.) Click and hold down one square above your ship. (Snaps should be on and helping you get it exact) Then, still holding the mouse down, drag down to one square below your ship.

Release your mouse, and drag your arc one square to the right.


Click once more, then your arc should be done.

Alright, now, we need to make a camera. In the sidebar, go to Create>cameras>Target Camera.


CHECK OTHROGRAPHIC PROJECTION!!! All of Starcraft's units were rendered with this on, and anything without it will look odd(er :P) ingame.

Next, move into your Top viewport once again. Click and hold 1 square above your ship, and drag until you are in the dead center of it. Release your mouse.


Now, we need to get your camera to follow the Arc around. Select your camera. At the top, go to Animation>Constraints>Path Constraint.

You should now have a dotted line following your cursor. Click on the Arc with it. Your camera should automatically snap to the start of it, which is the bottom.


But oh no! Its going to render it the wrong way! Lets fix that. Select your ship, and click on the Mirror button, it looks like two triangles with a line in the middle. Select Mirror Y axis.


Your model should now be facing upward, which is the correct way when it renders it.

Getting close! Change to the front viewport. Zoom out\in to where you can see your arc. Select it, and move it exactly one grid space upward, which puts the camera on a 45 degree angle, which all units were rendered at.


Now, we are ready to render it! IMPORTANT: MAKE SURE YOUR TIMELINE IS AT FAME 0 BEFORE YOU START THIS STEP!

Click on one of your viewports and press "C." You should now be seeing through your camera.

Now, go to Rendering>Render, and this window should come up:


Under the Common tab, make these changes:
Check Active Time Segment: 0 - 16. This will make it render all 17 frames out at once.
Change the size to 96 hight and 96 width.
Check the option Superblack. (This makes it render no transparency on the model itself.)
At the very bottom, where it says Viewport, make sure it says Camera01, or whatever.

Now, click on: Files...

That should bring up an explorer window. Find a place where you want to save 17 .bmp files. Name it lol.bmp, or polarisisgod.bmp, or something with a .bmp in it. Though, I would prefer you used polarisisgod.bmp :P

Hit ok, and it should bring up another window. Check 24 bit RGB, or whatever it is, and hit ok.

You are now all set. Again, make sure viewport is the camera, and the timebar is at frame 0.
Hit the big render button at the bottom. It should bring up a window, but just close out of it. Navigate to your folder that you saved your .bmps in, and compile them with your favorite GRP editor. Now, you have 2 options at this point: make it looks a lot better with Gimp or Photoshop, or put it ingame right away. I chose to make it look better. Here's my result:


Congratulations, you now know how to 3d model (kinda, just keep practicing), UVW map, and render units for Starcraft!
Now, what are you waiting for? GO MAKE SOME KICK-ASS MODS!

-End Part 3

-End Tutorial


If anything cool is ever going on Skype me up under the name "blarghle"

Aug 28 2008, 5:35 pm Scottp45 Post #4


Quote
Yay, now it looks remotely like a ship designed by drunk engineers! In fact, worse then that, it looks like it was designed by some silly 14 year old kid who has too much time on his hands! Oh wait...
Hey...Im some silly 14 year old kid with too much time on my hands....but I can do better than drunk engineers :bleh: .


None.

Oct 10 2008, 5:18 pm Darkmapper Post #5


Move the bottom layer to the top. (click and drag it) Now, you should see your unwrapped model in the front. Find the wings. (The topsides of them, that is) To find the right ones, switch back into wings, and follow this:
"You can click on the unwrapped objects in the UVW window, and not only will it highlight it in the UVW window, but it highlights it in the normal window as well. This is useful for identifying what face is what:


i dont understand this part. can someone eyplain it please? :(


None.

Oct 10 2008, 6:34 pm Devourer Post #6

Hello

thx for this good tutorial!


Please report errors in the Staredit.Network forum.

Oct 10 2008, 6:41 pm Darkmapper Post #7


i did a artilleryturret but i dont understand how to color it xD :lol:


None.

Oct 10 2008, 7:46 pm Devourer Post #8

Hello

i made a starwars imperial shuttle :D


Please report errors in the Staredit.Network forum.

Oct 10 2008, 8:09 pm Darkmapper Post #9


nice! lets see!


None.

Oct 11 2008, 9:06 am Devourer Post #10

Hello

Screen:
http://img139.imageshack.us/my.php?image=trstxd3.jpg

Attach:


Please report errors in the Staredit.Network forum.

Oct 24 2008, 6:23 pm Darkmapper Post #11


i found some 3d models on my computer too ^^. but i cant make them to grps. (cos my Gimp is defeat) Can somebody hlp me?


None.

Oct 24 2008, 7:10 pm Devourer Post #12

Hello

Quote from Darkmapper
i found some 3d models on my computer too ^^. but i cant make them to grps. (cos my Gimp is defeat) Can somebody hlp me?


first color the background to the color BLACK
than make screenshots for each frame, thats all
[press "print" and then open PAINT and press crtl+v save as bitmap]


Please report errors in the Staredit.Network forum.

Oct 24 2008, 7:47 pm Darkmapper Post #13


Quote from Devourer
Quote from Darkmapper
i found some 3d models on my computer too ^^. but i cant make them to grps. (cos my Gimp is defeat) Can somebody hlp me?


first color the background to the color BLACK
than make screenshots for each frame, thats all
[press "print" and then open PAINT and press crtl+v save as bitmap]

Works well, but these grps are all grey, and it goes long to make pics of it...


None.

Jan 3 2009, 2:39 pm Biophysicist Post #14


Sorry for the necro, but there is one useful feature I found in Wings: If you press Tab in most commands, it let's you input numbers instead of using the mouse. Eg. Selecting Move>X, pressing Tab, and typing -3 moves the selected thingy 3 units left. Useful on more complicated models.


None.

Jan 4 2009, 8:44 pm Alzarath Post #15

Praetor

Wait wait wait, you can do this all through a 3d modeller???? AND I'VE BEEN DOING IT FRAME BY FRAME FOR ALL THESE YEARS!?!?!?!? D': Well, thanks for the tut, I'll try it out now and see if it works for me.


None.

Jan 5 2009, 3:39 am Alzarath Post #16

Praetor

How do I render it in Gmax? I got up to the point of making arcs, cameras and everything, I just can't find how to render it, I downloaded some kit, but it only has save as > *.xml. And it wont even save for some reason. A little help would be nice. ^.^


None.

Jan 5 2009, 4:20 am Corbo Post #17

ALL PRAISE YOUR SUPREME LORD CORBO

There was some odd kit that I believe that could render on gmax. I could never use it, though.
Gmax, by default, has no rendering abilities.

What you can do is just extract your frams directly from the perspective viewport.


fuck you all

Jan 5 2009, 4:29 am Biophysicist Post #18


Quote from Corbo
What you can do is just extract your frams directly from the perspective viewport.
In Wings, or in Gmax? And how would you do that?


None.

Jan 5 2009, 4:46 am Corbo Post #19

ALL PRAISE YOUR SUPREME LORD CORBO

I guess it would work on both as long as wing also supports texture painting in viewports too.

You'd just change your view to "camera" the one that rotates and move frame by frame (in the camera timeline) and you'd do like prt scrn and paste them in paint.
Or you could get actual real software that CAN render.
There's free render plug ins for sketch up and sketch up is free. You could just get the 30 trial of max, maya. C4D. Bryce 5 is free and it's a good modelling tool (for landscaping at least) but I forget if it actually renders, it should, though.
Also, there's Lightwave 3D that I also think it's free.

Even if you don't know any of those programs you're better of in modelling in a program you know and using those just to render.
Then again I recommend the prt scrn for starters :P


fuck you all

Jan 9 2009, 3:44 pm Devourer Post #20

Hello

Quote
Now, go to Rendering>Render, and this window should come up:
Just a hint, redering -> render automatly starts to render, when you want to popup that window you have to go rendering -> render set up

thats all I want to say, great tutorial polaris.


Please report errors in the Staredit.Network forum.

Options
  Back to forum
Please log in to reply to this topic or to report it.
Members in this topic: None.
[2024-4-14. : 9:21 pm]
O)FaRTy1billion[MM] -- there are some real members mixed in those latter pages, but the *vast* majority are spam accounts
[2024-4-14. : 9:21 pm]
O)FaRTy1billion[MM] -- there are almost 3k pages
[2024-4-14. : 9:21 pm]
O)FaRTy1billion[MM] -- the real members stop around page 250
[2024-4-14. : 9:20 pm]
O)FaRTy1billion[MM] -- look at the members list
[2024-4-12. : 12:52 pm]
Oh_Man -- da real donwano
da real donwano shouted: This is the first time I've seen spam bots like this on SEN. But then again, for the last 15 years I haven't been very active.
it's pretty common
[2024-4-11. : 9:53 pm]
da real donwano -- This is the first time I've seen spam bots like this on SEN. But then again, for the last 15 years I haven't been very active.
[2024-4-11. : 4:18 pm]
IlyaSnopchenko -- still better than "Pakistani hookers in Sharjah" that I've seen advertised in another forum
[2024-4-11. : 4:07 pm]
Ultraviolet -- These guys are hella persistent
[2024-4-11. : 3:29 pm]
Vrael -- You know, the outdoors is overrated. Got any indoor gym and fitness equipment?
[2024-4-10. : 8:11 am]
Sylph-Of-Space -- Hello!
Please log in to shout.


Members Online: otorusvgjq, Oh_Man